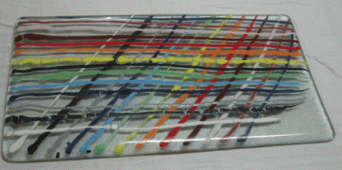
Creating Color Reference Strips for Glass Paint
I am a huge fan of testing any and everything before I commit my time to a big project. In fact, the first thing I do when I get a new glass product is create a reference (or test) chart. It is also quite useful to have these tests on hand for later reference, or as an example for classes, workshops, or even studio visitors.
Creating a reference chart is easy, you just do an organized fusing of all of the colors/variations of a new product together. It’s a good idea to do it in a way to both tests the products reactions and is easily labeled after fusing. A color reference won’t really help you if you don’t know what the colors are! Here’s an example of how I made a color reference chart with paint. I’m looking for post fusing color, and also if there are any inter color reactions.
Paint tests can be useful for both recycled glass and for art glass. Start with a piece of base glass and all of your paints. My base glass is float since that’s what I most often paint on, and Glassline Paints, as those are the ones I paint with.

Starting on one side, draw a long line of one paint color, and then another across it at an angle.

Repeat with each color so you have a grid of overlapped paint lines. The idea is to have every color cross every other color.

Now fuse the test piece.

The finished test piece can tell us many things:
- How the paint color changes during firing
- If the paint colors react to each other
- If any of the paint colors have glass compatibility issues (use your polarized film to check for this)
- Pin Me!


