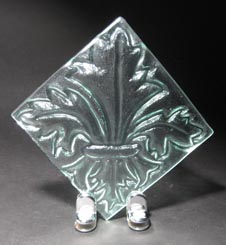
Texture tiles are essentially flat ceramic molds for fusing glass. If you are making your own texture tiles, there are a few things to consider before you start.
1. End purpose of the glass piece
What will you be using the textured piece for? Will it stand alone? Be slumped into something else, or included into a larger piece?
2. Should the pattern be incised into the glass, or bas relief.
The pattern on the glass will be the opposite of the texture on the tile. If you want the pattern to protrude (bas relief) from the glass, you need to cut that texture into the clay. If you want the texture incised into the glass, you have to cut away everything else.
3. Which side of the glass will you be looking at?
If you intend for the pattern to be on the back of the finished glass piece, the pattern will go onto the tile the same direction as you want to look at it. If you intend to have the texture side face up, the pattern will be opposite.
4. Will it work?
Think through your pattern carefully. You will be creating a three dimensional design from a two dimensional drawing, sometimes things don’t translate so well. If you are working from a drawing, try shading the parts you will be cutting out. This quick trick will often save you time later when you realize that you are intending to remove adjacent sections without a border between.
Once you’ve decided on a design, you need clay. In my workshops, we use whiteware clay that fires to Cone 06. Your local ceramic store can help you with both sourcing clay, and in many cases, fire the molds for you for a small fee.
After some trial and error, I found a slab 3/8″ thick works very well. It is thick enough to do robust carving, and to resist warping far better than a 1/4″ slab.
Add in some low tech clay tools and let the glass mold making begin. As you make a texture tile, keep these guidelines in mind:
- absolutely no undercuts! Make sure all edges slope at an angle down into the cuts. Glass will grab undercuts and break during cooling. Your mold may also break.
- Don’t carve too deep, you are working with 3/8″ slab here, be aware of how deep your pattern is. If you do need to do a deep carving, keep in mind wide patterns work best here.
- Remember the kiln wash. Fine details may need to be exaggerated to compensate for the kiln wash.
Here is a tile made by workshop participant Cheryl Peterson (greenware)
after bisque firing
When you are ready to fire glass on your texture tile, there are just a few things you need to do:
- kiln wash the entire tile. I recommend coating the sides of the tile too, just in case your glass gets ambitious and tries to run away.
- cut the glass about 1/8-1/4″ smaller than the tile. This will depend on your willingness to risk the glass falling over the edge during firing.
- be prepared to test! Use a full fuse firing schedule first and see how much detail your tile picks up. If you have deeply carved texture, you may need to fire longer or hotter.
Here is the tile with glass before fusing,
And after, with fused glass:
 |
 |
 |
 |
 |
 |
 |
 |
 |


