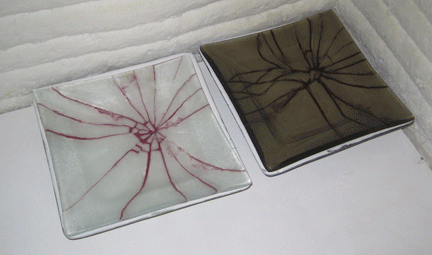
Today’s tutorial satisfies almost all of my happiness bullet points: glass, hammers, and hairspray. Just kidding, I have higher standards than that, although this project does have all of those elements. The great thing about this particular project is every single one is different, you could fill a whole market booth with variations of this project and it would look great!
1. Start by selecting a mold. Squares are easier than circles for this project, so let’s start with that. I’m using a nearly 8″ square. I’m going to cut one square that is 7.75″ and one that is .25″ SMALLER, so, 7.5″. When you are using recycled glass, these two pieces must come from the same sheet of glass.
Here are the two squares stacked:
Yes, that is bronze tinted window glass. Don’t confine yourself only to clear recycled glass, there are a few colors out there!
2. Clean the glass and carefully wrap the SMALLER piece in clean paper. It is critical to use the smaller square, if you wrap up the big one, you’ll have to start over. Now, put that paper wrapped glass on a hard surface and smack it with a hammer.
3. Carefully open the broken glass without moving the pieces. It works best to leave it on the paper. Looks great!
4. Here’s the part where you have to work fast. Put the unbroken square next to the broken square and spray it quite liberally with liquid hairspray, pump, not aerosol. I use the cheapest unscented kind I can find. Now, QUICKLY move the fractured pieces over onto the base piece. It works best to move the corners first and line them up, then fill in. Line up all of the pieces with the edges of the base glass.
What we are using that .25″ size difference to create gaps between the fractured pieces that we will fill with contrasting powder (or frit). The hairspray will ‘glue’ the two layers together to make powder spreading easier. Once you have the pieces positioned, let the hairspray dry completely.
You can see that there are gaps, and I didn’t move all of the super fine crumbs of glass over. You can add as many of the tiny pieces as will fit, or leave larger gaps for more contrast. Once the two layers are assembled and dry, you’ll need some Float Fire powder or frit. Float Fire is a 82 coe powder, frit or sheet that is compatible with float glass and bottles. If you’re working with fusing recycled glass, this product will expand your horizons.
I’m actually using a different color for this project, but this label is nice.
4. Place your now dry project on a sheet of paper so we can collect the extra powder when we’re done, and don your safety gear. Frits and powders are dusty, so be safe! Dump some powder into the center of your project.
5. Spread the powder carefully into all of the fractures. You can use a paint brush for this, but I found a 3 x 5″ card was easier. I’m not all that patient.
Once the powder is all spread into all of the fractures, put your project into the kiln on a prepared shelf. Collect the extra powder and return it to the bottle.
6. Fuse that gorgeous thing!
See how cool that is??
7. Now back into the kiln for a slump.
Want to see another one?
- Pin Me!


