
Mica flakes are beautiful sparkly things, but what do you DO with them? Here’s a handy tutorial showing two different ways to use mica flakes and stencils in your fusing projects.
Materials:

Mica Flakes and Stencils materials
Flat Glass (we’re using float)
silicone tip tools
flat ended X-acto knife
Hairspray
N95 particulate mask
We’ll be doing two different versions of the same design using one stencil. Ready?
Step 1:
Put your glass on a sheet of paper to catch the extra mica as we sprinkle, and place the stencil on the glass in a place that seems pleasing to you. Put on your particulate mask and carefully sprinkle mica flakes over the stencil. A thin even coat is best.

Sprinkle mica flakes
Step 2:
Carefully lift off the stencil and shake extra mica back into the container.

Lift off Stencil
Spray the glass with hairspray to keep mica in place. You’ll need to spray from a distance so the force of the hairspray doesn’t blow the mica flakes around.

Step 3:
Mica is an inert material, which means it won’t fuse with your glass. Therefore it needs to be capped, and for best results, a narrow edge around the glass needs to be left clear to ensure the mica is fully encapsulated during the fuse firing. To do this, use your silicone tipped tool to wipe the mica from around the outside edge of the glass.
If the hairspray gets too dry and you can’t wipe off the mica, use the flat tipped X-acto knife to finish.

Clear Edges around the outside of the glass
The last step is to cap the glass with another sheet of compatible glass. Now we fuse this to a full fuse, with extra time at the bubble squeeze to help keep things bubble free.

Capped glass – Detail

Capped mica ready to fuse
Mica Flakes and Stencils Version 2
This time we are using the stencil as a mask to determine what mica to remove. This version uses the same materials and processes, but in a different order. Make sure you keep that particulate mask on!
Step 1:

Spray glass with hairspray
Place glass on a sheet of paper to catch extra mica and spray an even coat of hairspray over the whole piece of glass.

Hairspray coating
Step 2:

Sprinkle mica flakes
Sprinkle mica flakes over the surface of the glass. A thin even coat is best, and you’ll have to work fast to cover before the hairspray dries. After the hairspray is dry, tip the extra off onto the sheet of paper.

Tip off extra mica
Step 3:

Place stencil on glass
Place the stencil on the mica coated glass in a way that is pleasing to you.
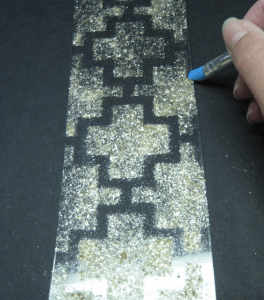
Using the flat ended knife blade, scrape off the mica that is exposed by the stencil.

Keep scraping until all of the exposed mica is removed

keep scraping

Done!
Edge any of the mica areas that reach the outside edge of the glass, as in Version 1. Cap and you are ready to fire to a full fuse.

To review, here are the two versions together:

And a lantern made with the V2. mica and stencils tutorial:

Garden lantern from the video class – Garden Lights & Lanterns
Related products:
Related Articles:
Avoiding bubbles with mica sheets
On Demand Video Class for Fused Glass Lanterns on CuriousMondo.com
-

- Please pin and share!
-

- Requires ability to analyze and problem solve
-

- Mica is a silicate, use a respirator!