Recently I was honored to accept a commission from the S.J. Quinney College of Law at the University of Utah. They requested a sculpture that would be presented to a major donor of funds for LEED certification in the new College of Law Building.
This was an exciting request for me, as it also supports my own sustainable mission. To begin the project, I visited the University of Utah campus and photographed the trees in front of the existing College of Law building.
Working from these photographs, I simplified the tree structures down and made a full size sketch. The working size of the glass is 14″ high x 16″ wide x 3/8″ thick. The glass is from a table top that was given to me by a gallery as it was no longer needed.
Using an oil paint marker, I traced the trees onto the glass, then flipped it over and traced over my lines on the back of the glass too. Having the lines on both sides will make carving easier, then if one part of the line gets removed, I’ll have the line on the reverse as a guide.
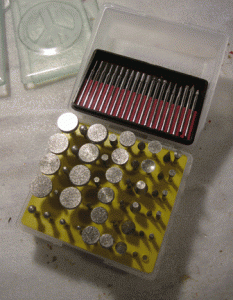
Now, I’m ready to start carving. I’m using a set of diamond bits and a gravity feed water system with thin surgical tubing:
The water siphons from the jug on the left onto the glass in driblets, controlled by a binder clip on the tube. The waste water is siphoned out of the pan on the lower right, where it is collected in a different jug and held until the sediment settles out, and then reused. I also wear a respirator while I carve, as sometimes the silica dust does fly. I’m using a flex shaft tool in conjunction with the diamond bits. The flex shaft (not visible in the picture) is hanging above the pan and slightly to the right.
The carving took nearly 7 hours. I can only carve for an hour at a time, so the carving was interspersed with other activities over a couple of days.
Here the trees are nearly finished. This is viewing through the front of the glass, if you look closely, you can see the texture on the trunks and branches. Here is a close up of the carving:
After the trees are all carved, I polished the edges of the glass and beveled the corners with my bench grinder. Once that is finished, it was time to slump and fire polish. First, I had to build a mold. I used two separate pieces of stainless steel sheet, curved in opposite directions to give me a smooth S shape.
The stainless sheet isn’t thick enough to stand alone, so I have flower pots on their sides under the top curve, and kiln furniture propped under the bottom curve. The binder clips hold the two pieces together. Because I want the seam to be invisible, I cover the whole thing with a piece of 1/32″ fiber paper, then top that with shelf paper to minimize the surface texture. Then add the glass.
The edge of the glass is lined up with that folded edge of the stainless mold to make sure it stays at the right angle.
The base of the sculpture was made with walnut that was rescued from the waste bin of a local wood shop. It is 2″ thick, so quite substantial! Luckily I have access to a talented wood worker who cut the base into a smooth oval. He routed a nearly 1″ deep grove into the walnut, then sanded it by hand until the glass fit perfectly and snugly. Then he drilled a hole in the bottom of the groove, flipped the base over and removed a disc and cut an additional much smaller groove cut from the disc to the edge of the base. This was done to accommodate the plug and cord of the flexible LED light strip. The LED light strip was cut to size and adhered to the bottom of the groove using glaziers tape. The light strip plugs into the power cord under the base.
Then the glass was added on top of the LED lights. The light strip is programmable and multi color. It can be set to 15 different solid colors, or can be set to fade through and change color. All of the colors looked really spectacular with the glass.
Click for video of the color change lights.
Tree Sculpture with color LEDs
Related Articles:
Cast Float Glass Sculpture Installation


